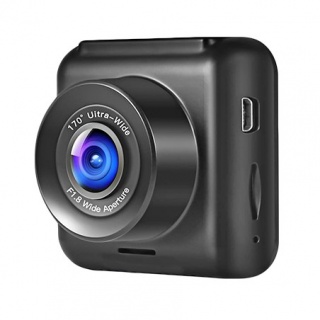
Durite 4K HD resolution dash camera featuring a 4.0MP high-resolution camera and built-in GPS. No external aerial is required.
- Perfect for 12V and 24V applications, vans, rigid vehicles and articulated lorries.
- 4K ultra HD real-time recording.
- WiFi streaming.
- Built-in G-force sensor and GPS.
- Motion detection/theft prevention.
- Large depth of field with 170-degree wide angle lens.
- Suitable for 12/24V application.
Important Information
If a vehicle is allocated to a specific driver, this will count as personal information under the data protection law - Data Protection Act 1998.
Product Overview
This is a full HD video dash camera recorder. Please see the summary spec below:
- (1) Dual lens version: Front cam FHD 1080P@30fps rear cam FHD 1080P@30fps. (part 0-775-44).
- (2) Single lens version (0-775-53). UHD 2160P@24fps, QHD1440P@30fps, FHD 1080P@60fps
- (3) With the built-in WIFI function, you can wirelessly control the machine using a smartphone and preview or download video or pictures from the machine.
- (4) The function of time-lapse can greatly save the memory card space occupied.
- (5) Built-in GPS module for recording metadata (time, location and speed) and for easy installation.
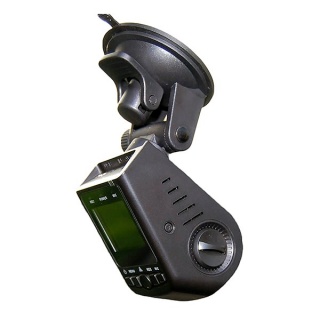
Key Function and Port
- Power: Press the power key to start the device and press it for 3 Secs again to power it off. Short press to turn the screen off/on.
- Menu/Mode: In standby mode, press and hold it to switch video/photo/playback mode. In the video/photo/playback mode, short-press it to enter the menu.
- Video Menu: In the video mode, press it to enter the video settings menu. Press it again to enter the system settings menu. Press again to quit.
- Photo Menu: In the photo mode, press it to enter the photo settings menu. Press it again to enter the system settings menu. Press again to quit.
- Playback Menu: In the playback mode, press it to enter the playback settings menu. Press it again to enter the system settings menu. Press again to quit.
- Screen Switch: Press it to switch the front and rear camera frames for the dual-lens version. For the single-lens version, press it to open/close the screen. For the wifi version, press it for 3 Seconds to open/close the wifi function.
- OK/Lock: In the menu interface, press it to confirm in the video recording mode, and press it to lock the video.
- REC/Up: In standby mode, press it to start recording. In the menu interface, press it to navigate up.
- Record/Down: In the standby/video recording mode, press it to turn on/off the MIC. In the menu interface, press it to navigate down.
- Reset: If the device has crashed, press it to restart.
- TF Card Slot: Support 8GB-128GB TF card (ONLY Class 10 or above).
- Rear Lens Port: Use the rear camera cable connecting the rear camera.
- USB Port: Use the car charger to supply DC 5V power for the device.
- Lens Knob: Turn the knob to adjust the camera angle.
- Image Flip Switch: Toggle this switch to select the horizontal direction of the rear lens display as positive or mirror.
Installation and Operation
Turn off the car engine. Insert the TF card into the card slot of the device (the TF card should be 8GB~128GB, Class 10 or above). If using it for the first time, please format the TF card. NOTE: An error message may appear; press Menu to continue past this message to complete the format.
Install the bracket on the device, and use the 3M sticker to fix the device on the car front windshield, ideally behind the rearview mirror in the centre of the windscreen.
Plug the car charger into the car cigarette lighter and the other end into the device power interface. (wiring along the edge of the windshield as possible).
Start the engine and check if the machine has been installed successfully.
Make sure the protective film of the lens is OFF.
When the vehicle engine starts, this device will be powered on automatically and start to record video, with the following conditions:
1) The available TF card is inside this device.
2) The charger and cigarette lighter have been connected to this device.
Manually turn the camera On/Off by pressing the power button once to power on and press it again to power off.
After starting the vehicle engine, the device is automatically started, and the recording function is enabled. The red REC icon on the screen blinks.
For manual recording - In the standby state, press the REC key to enter video recording mode, and the red REC icon on the screen blinks. Press the REC key again to stop recording, and the red REC icon disappears.
Photo Mode: Press the Menu/Mode key to enter photo mode. Press the OK key to take a photo—Press Menu/Mode key to enter the photo setup option.
Manage Files: Press and hold the Menu/Mode key twice to enter File Management mode. There are 2 types of files: Video and Image. The most recent file will be displayed on LCD. For example, If your last action was taking a photo, the photo will be displayed on LCD.
Video Playback: Press the UP/DOWN key to select the desired file for playback.
Image Playback: Press the UP/DOWN key to select the file. 1. Delete: Press the OK key to delete the file. 2. Protect: Select locking or unlocking the file. 3. Slide Show: Select 2 Seconds/5 Seconds/8 Seconds to browse the files. Remarks: If the device crashes in use, press the RESET key to restart it.
Function and Using
What is loop recording?
The recorded video could be in different clips: e.g., Off/1Minute/3Minutes/5Minutes. Loop recording is the process of recording video continuously to an endless memory card. This process is a never-ending one. At the end of the memory card, the latest video clip will replace the earliest video clip to save the memory card.
How to use it?
In standby mode, enter the menu, using the DOWN key to select the loop recording function; when the cursor moves to loop recording, press the OK key to set different clips time 1Minute/3Minutes/5Minutes by UP/DOWN key. If you select Off, the loop recording function will be off.
What is the G-Sensor function?
During loop recording, if the G-sensor detects a collision or shaking, the device will lock the current video to avoid deleting in the loop recording.
How to use it?
In standby mode, enter the menu, using the DOWN key to select the G-sensor function, choose G-sensor, and press the OK key to set different sensitivities. Off/Low/Medium/High: If you select Off, the G-sensor function will be off.
What is motion detection?
Motion detection is the process of detecting movement in the lens. In the standby status, when it detects movement in the lens, it will start to record until the image is still for ten seconds. It helps to save memory space.
How to use it?
In standby mode, enter the menu and set the motion detection to ON. If it is in Off mode, motion detection will not work. Please set it to Off when it is not needed.
What is GPS?
GPS is the global positioning system. Open this function, and the device can automatically update the time, locate and record your travel route, time, date, speed and so on.
How to use it?
In standby mode, enter the menu, find the GPS option and select KM/H or MPH. If you select Off, GPS will not work. Set the current time zone in the menu. (If the time zone setting is incorrect, the time for the automatic update will be incorrect). Download GPS Player to your PC, play the video in GPS Player video, and the road track will show on the video simultaneously. Be sure that your PC is connected to the network.
What is WIFI?
This machine supports WIFI direct protocol. It means that the device can wirelessly transmit data without passing through the wireless router. Therefore, you can wirelessly control the machine using a smartphone and preview or download videos or pictures from the machine.
How to use it?
In standby mode, enter the menu, find the WIFI option and select ON (Or press and hold the Screen Switch key). Download the RICAM APP (see below) through the phone, use the phone WIFI to search for the machine(The WIFI name of the machine is usually started with NVT_CARDV), and enter the password to establish a connection(The default password is 12345678), then open the APP. You can see the real-time video interface. Press the corresponding button to make the appropriate settings, preview and download.
Password Protection
There is a password required to access the menu. The Menu/Mode button is used to alternate between the number selections. The default password is 1 2 3 4 and is selected using the UP and DOWN buttons. Press OK to confirm access to the menu. If the password is incorrect, it will revert back to the video recording interface.
Specifications
| Type | 4.0 Megapixel UHD Dash Camera |
| View Angle | 170 degree |
| Resolution Rate | UHD 2160P, QHD1440P, FHD1080P |
| Frame Rate | 24FPS, 30FPS and 60FPS |
| 2nd Camera Resolution | N/A (refer to part 0-775-44) |
| Video Compression Format | H.264 |
| Video Output Mode | NTSC/PAL |
| Screen Size | 2 inch |
| Operating Temperature | -10 degrees C to +60 degrees C |
| Memory Card | 4-128GB Class 10 or higher |
| Standard Voltage | 5VDC/12VDC |
| Night Viewing Distance | 5 Metres with headlights |
| GPS | Yes |
| G Sensor | Yes |
| WiFi | Yes |
| Certification | CE, RoHS |

.jpg)
.jpg)